Thread
Thread는 운영체제에서, 프로세스 실행 단위를 일컫습니다. 하나의 프로세스가 한 개 이상의 쓰레드를 가지며, 다수의 Thread를 이용하여, 동시에 두 가지 이상의 일을 실행 시킬 수 있습니다. 이를 멀티쓰레드 프로세스라고 합니다. 멀티쓰레드 프로세스는 다음과 같은 장점들을 가집니다.
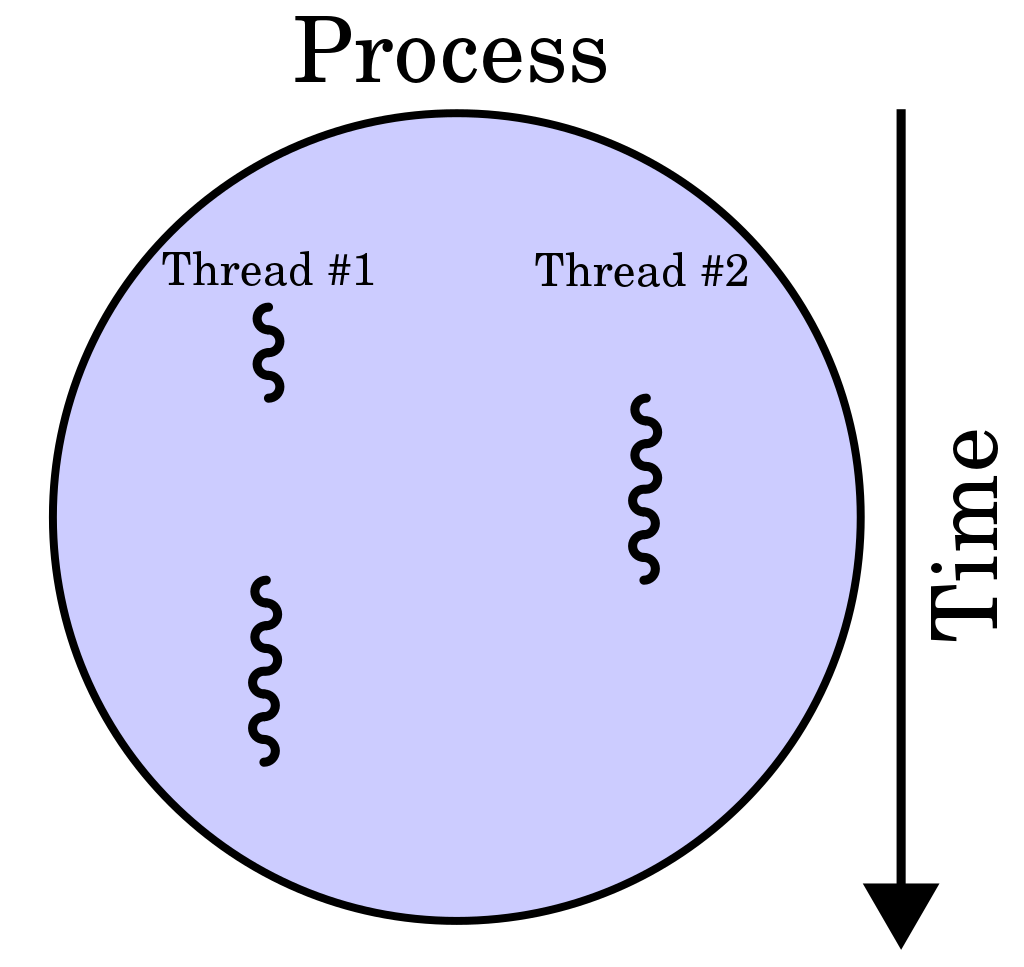
출처: https://en.wikipedia.org/wiki/Thread_(computing)#/media/File:Multithreaded_process.svg
멀티쓰레딩의 장점
- 프로그램의 일부가 긴 작업을 수행 하더라도, 다른 곳에서는 프로그램의 수행이 계속 진행 될 수 있습니다.
- 프로세스 내 자원들을 여러 개의 쓰레드에서 공유하기 때문에 메모리 공간과 시스템 자원 소모가 줄어 들 수 있습니다.
- 멀티프로세서를 활용 할 수 있습니다.
우리가 실제로 사용하는 프로그램에도 멀티쓰레딩을 사용하는 경우는 많습니다. 카카오톡에서 파일 업로드 도중에 메시지를 보내거나, 웹 브라우저에 창 여러개를 열어서 작업 하는 것과 같이 말입니다.
Java 에서 쓰레드를 구현 하기 위해선, 세 가지 방법 중 하나로 작성 하여야 합니다. 하나는 Thread 클래스를 상속 받아 구현 하는 것이고, 다른 하나는 Runnable 인터페이스를 구현 하는 것입니다. 두 개다 public void run() 함수를 구현 해 주어야 한다는 공통점이 있습니다.
Thread를 실행 하기 위해서는 thread.start() 메서드를 호출 해 주어야 합니다. 왜 run()을 구현 하였는데 start()를 호출 하는가? 에 대해서 의문을 가지실 수 있습니다. start()는 새로운 쓰레드를 생성하고, 쓰레드가 작업 하는 데 사용될 Call Stack을 생성, 해당 Call Stack에 run() 을 호출하여 사용합니다. 이제 main() 을 실행 시키는 main thread와, 우리가 새로 만든 thread가 존재 하므로, CPU는 이 둘을 오가며 쓰레드를 번갈아 실행 시킵니다.
Thread클래스를 상속 함.
class SimpleThread extends Thread {
    private int number;

    SimpleThread(int number) {
        this.number = number;
    }

    public void run() {
        System.out.printf("Simple Thread %d Start%n", this.number);
        try {
            Thread.sleep(1000);
        } catch (Exception e) {}
        System.out.printf("Simple Thread %d End%n", this.number);
    }
}

public class Main {
    public static void main(String[] args) {
        for (int i = 0; i < 5; i++) {
            SimpleThread simpleThread = new SimpleThread(i + 1);
            simpleThread.start();
        }
        System.out.println("Main 함수 종료.");
    }
}Runnable인터페이스를 구현
class SimpleThread implements Runnable {
    private int number;

    SimpleThread(int number) {
        this.number = number;
    }

    public void run() {
        System.out.printf("Simple Thread %d Start%n", this.number);
        try {
            Thread.sleep(1000);
        } catch (Exception e) {}
        System.out.printf("Simple Thread %d End%n", this.number);
    }
}

public class Main {
    public static void main(String[] args) {
        for (int i = 0; i < 5; i++) {
            SimpleThread simpleThread = new SimpleThread(i + 1);
            Thread thread = new Thread(simpleThread); // Thread 객체를 생성 하여, 인터페이스를 구현한 클래스의 객체를 생성자에 넣어야 함.
            thread.start();
        }
        System.out.println("Main 함수 종료.");
    }
}
둘은 똑같은 결과를 보여 줍니다.
Simple Thread 1 Start
Simple Thread 5 Start
Simple Thread 2 Start
Main 함수 종료.
Simple Thread 4 Start
Simple Thread 3 Start
Simple Thread 4 End
Simple Thread 5 End
Simple Thread 1 End
Simple Thread 3 End
Simple Thread 2 End
마지막으로 쓰레드를 만드는 방법은 익명 객체를 사용 하는 것 입니다. 단, 파라미터를 사용 하는데 제약이 있습니다.
public class Main {
    public static void main(String[] args) {
        for (int i = 0; i < 5; i++) {
            Thread thread = new Thread(new Runnable() {
                @Override
                public void run() {
                    System.out.printf("Simple Thread Start%n");
                    try {
                        Thread.sleep(1000);
                    } catch (Exception e) {}
                    System.out.printf("Simple Thread End%n");
                }
            });
            thread.start();
        }
        System.out.println("Main 함수 종료.");
    }
}
Simple Thread Start
Simple Thread Start
Main 함수 종료.
Simple Thread Start
Simple Thread Start
Simple Thread Start
Simple Thread End
Simple Thread End
Simple Thread End
Simple Thread End
Simple Thread EndThread의 개념에 대해서 모르는 사람들은 다음과 같은 의문을 가질 수 있습니다. "아니 분명히 순차적으로 실행해야 하는 데, 왜 이렇게 순서가 뒤죽 박죽이지?" 그 이유는 Thread는 순서가 존재 하지 않기 때문 입니다. 우선 순위를 정해 주기 전에는 말입니다. 하지만 멀티 코어를 사용 하고 있고, 같은 자원을 공유 하지 않고, 각자의 Call Stack에서 해결 할 수 있는 작업이라면, 우선 순위가 있어도 끝나는 시간이 다를 가능성이 높습니다.
우선순위 설정 하기
일단, 우선 순위를 넣는 방법은 thread.start()를 하기 전에 thread.setPriority(int value)를 넣는 것 입니다. value로 들어 갈 수 있는 값을 1부터 10까지 입니다. 이를 통해서 우리는 같은 자원을 사용하는 Thread 사이에서, 어떤 Thread가 우선적으로 자원을 가져 갈 수 있게 할 것 인지 설정 할 수 있습니다.
// 윗 부분은 생략

public class Main {
    public static void main(String[] args) {
        for (int i = 0; i < 5; i++) {
            SimpleThread simpleThread = new SimpleThread(i + 1);
            Thread thread = new Thread(simpleThread); // Thread 객체를 생성 하여, 인터페이스를 구현한 클래스의 객체를 생성자에 넣어야 함.
            thread.setPriority(i + 1);
            thread.start();
        }
        System.out.println("Main 함수 종료.");
    }
}
Daemon Thread
데몬 스레드는 메인 스레드의 작업을 돕는 보조적인 역할을 수행 합니다. 기존 스레드는 메인 스레드가 종료 되더라도, 계속 실행되는 반면, 데몬 스레드는 같이 종료 됩니다. thread.setDaemon(true)를 통해 설정 할 수 있습니다.
// 윗 부분은 생략

public class Main {
    public static void main(String[] args) {
        for (int i = 0; i < 5; i++) {
            SimpleThread simpleThread = new SimpleThread(i + 1);
            Thread thread = new Thread(simpleThread); // Thread 객체를 생성 하여, 인터페이스를 구현한 클래스의 객체를 생성자에 넣어야 함.
            thread.setDaemon(true);
            thread.start();
        }
        System.out.println("Main 함수 종료.");
    }
}
Simple Thread 2 Start
Simple Thread 5 Start
Main 함수 종료.
Simple Thread 3 Start
Simple Thread 4 Start
Simple Thread 1 StartThread Name
thread.setName(String s)를 통해, Thread에 이름을 지정, 디버깅을 편하게 할 수 있습니다. Thread.currentThread().getName() 로 현재 쓰레드의 이름을 가져올 수 있습니다.
public class Main {
    public static void main(String[] args) {
        Thread thread1 = new Thread(new Runnable() {
            @Override
            public void run() {
                System.out.println(Thread.currentThread().getName() + " 실행");
            }
        }); // Thread 객체를 생성 하여, 인터페이스를 구현한 클래스의 객체를 생성자에 넣어야 함.
        Thread thread2 = new Thread(thread1);
        thread1.setName("1번");
        thread2.setName("2번");
        thread1.start();
        thread2.start();
        System.out.println("Main 함수 종료.");
    }
}
Main 함수 종료.
2번 실행
1번 실행Thread의 실행제어
Thread를 다루기 힘든 이유는 동기화, 스케쥴링, 상태 제어 등등 신경 써 줘야 할 것들이 많기 때문입니다. 또한, 쓰레드 프로그래밍을 하면서, 자원 낭비가 되지 않도록 하는 것도 중요 합니다. 일단, 그 전에 우리는 쓰레드의 상태와 관련 메서드들에 대한 것들을 잘 알아 둘 필요가 있습니다.
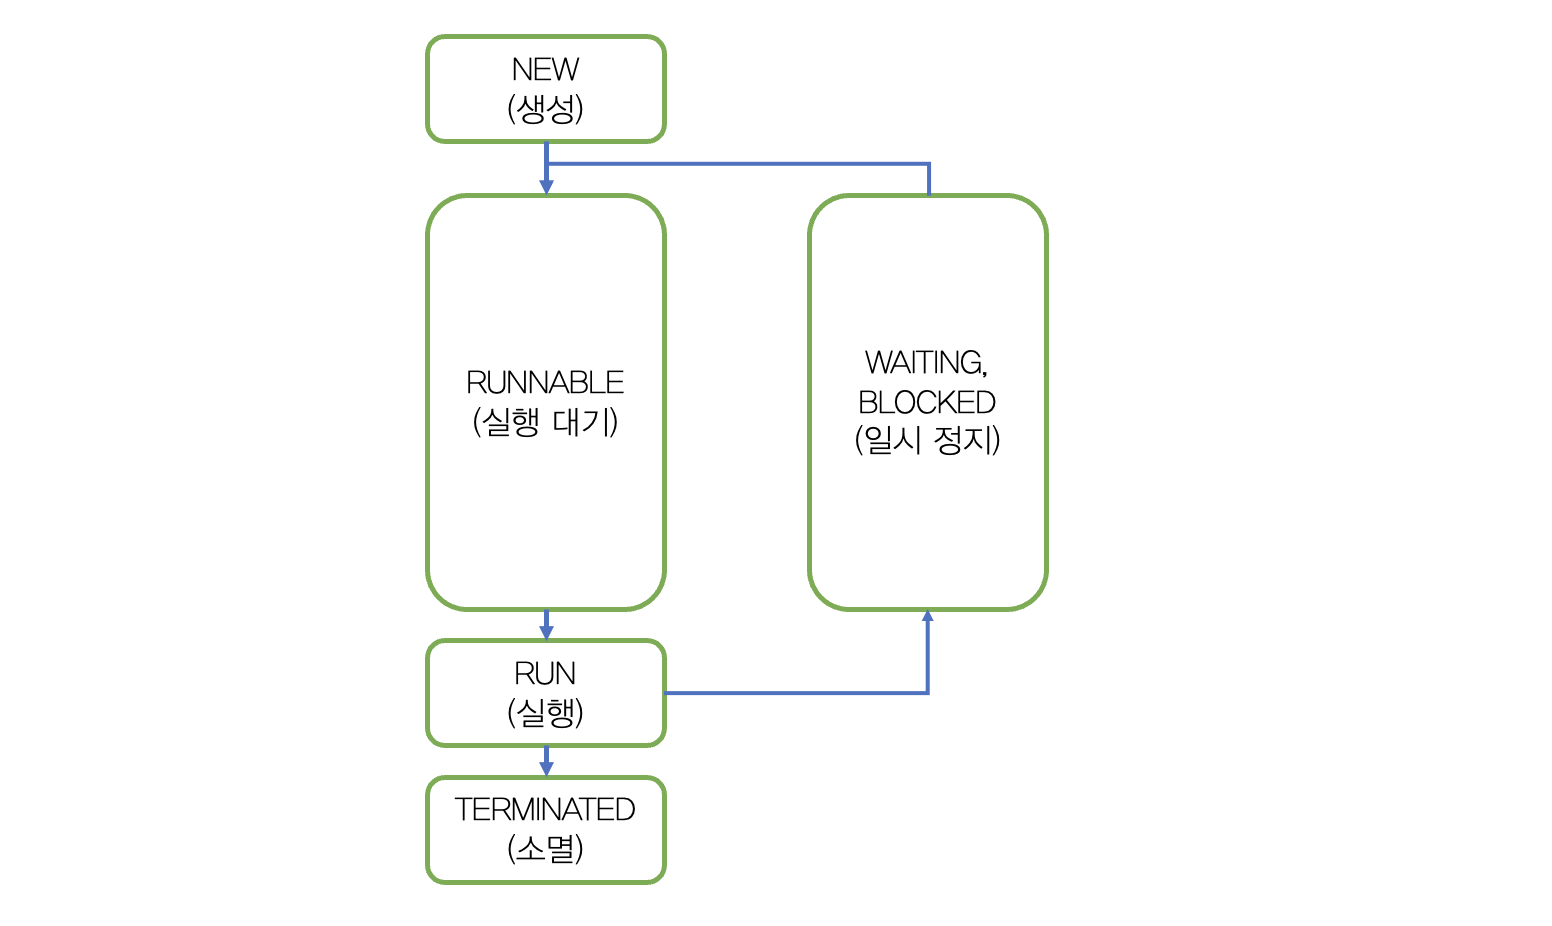
Thread가 가지는 상태들
Thread는 다음과 같은 상태를 가집니다.
- 생성: Thread 객체가 생성 된 상태 입니다. 아직
start()가 호출되지 않은 상태 입니다. - 실행 대기:
start()가 호출이 된 상태로, 쓰레드에 CPU 코어가 할당 될 때 까지 기다리는 상태입니다. - 실행: Thread가 작업을 진행 하는 상태 입니다.
- 일시 정지: Thread의 작업이 종료 되지 않으면서, 동기화 블럭으로 인한 BLOCK 상태, 사용자 입력 대기 등 여러 가지 이유로 일시 정지가 되어, 실행 대기 상태로 넘어 가지 않은 상태를 일컫습니다.
- 소멸: Thread의 작업이 종료 된 상태 입니다.
Thread가 가지는 상태제어 메서드들
start(): 쓰레드를 생성 상태에서, 실행 대기 상태로 이동 시킵니다.sleep(long mills): 쓰레드를 실행 상태에서,mills밀리 초 만큼 일시 정지 상태로 전환 시킵니다.
// 생략

public void run() {
    System.out.printf("Simple Thread %d Start%n", this.number);
    try {
        Thread.sleep(1000);
    } catch (Exception e) {}
    System.out.printf("Simple Thread %d End%n", this.number);
}interrupt(): 쓰레드의 작업을 취소 합니다. Sleep 상태일 경우, 예외가 호출 됩니다.
import java.util.Scanner;

public class Main {
    public static void main(String[] args) {
        Thread thread = new Thread(new Runnable() {
            @Override
            public void run() {
                int i = 0;
                try {
                    while (true) {
                        Thread.sleep(1000);
                        i++;
                        System.out.println(i + "초");
                    }
                } catch (InterruptedException e) {
                    System.out.println("당신은 " + i + "초 만에 답을 입력 했습니다.");
                }
            }
        });
        thread.start();

        Scanner scanner = new Scanner(System.in);
        System.out.print("아무 값이나 입력 해 주세요: ");
        String input = scanner.nextLine();
        System.out.println("당신이 입력 하신 값은 " + input + "입니다.");
        thread.interrupt();
    }
}
아무 값이나 입력 해 주세요: 1초
2초
3초
4초
5초
6초
123
당신이 입력 하신 값은 123입니다.
당신은 6초 만에 답을 입력 했습니다.yield(): 다음 차례의 쓰레드에게 실행 시간을 양보 합니다. 실행 상태에서 실행 대기 상태로 전환 합니다. 이는 무조건 쓰레드가 양보함을 보장하지 않으며 스케쥴러가 참고 하여 스케쥴링에 있어 이를 고려 합니다. 이렇게 하는 것이, 현재 많은 자원을 요하는 스레드에 더 많은 자원을 제공 할 수 있도록, 스케줄러에게 도움을 줄 수 있기 때문이죠. 자세한 내용은 해당 블로그를 참조 해 주세요.
// 중략
while (!stopped) {
    if (!suspended) {
        try {
            Thread.sleep(1000);
        } catch (InterruptedException e) {}
    } else {
        Thread.yield();
    }
}
// 후략join(): 다른 쓰레드의 작업을 기다립니다. 현재 실행 중인 쓰레드에서,join()을 호출한 쓰레드가 종료 될 때 까지 기다립니다.
class HumanRunnable implements Runnable {
    private Thread trafficLight;

    public HumanRunnable(Thread trafficLight) {
        this.trafficLight = trafficLight;
    }

    @Override
    public void run() {
        try {
            System.out.println("신호 대기 중.");
            trafficLight.join();  // 신호 대기
            System.out.println("건너자!");
        } catch (InterruptedException e) {}
    }
}

class TrafficLightRunnable implements Runnable {
    @Override
    public void run() {
        try {
            System.out.println("빨간 불...");
            Thread.sleep(1000);  // 신호는 1초...
            System.out.println("파란 불!");
        } catch (InterruptedException e) {
            e.printStackTrace();
        }
    }
}

public class Main {
    public static void main(String[] args) {
        Thread trafficLight = new Thread(new TrafficLightRunnable());
        trafficLight.start();  // 신호등 쓰레드 시작

        Thread human = new Thread(new HumanRunnable(trafficLight));
        human.start();  // 사람 쓰레드 시작
    }
}
빨간 불...
신호 대기 중.
파란 불!
건너자!Synchronized
우리는 여러 쓰레드가 하나의 자원을 공유 하는 경우를 자주 경험 합니다. 예를 들어서, 통장 잔고를 예시로 들어 보면, 하나 이상의 입금과 출금이 동시에 일어 나는 경우가 있을 수 있겠죠? 한 계좌의 잔고를 이용하여 덧셈 뺄셈 연산을 할 테니까요.
다음과 같은 예시를 들어 보겠습니다. 해당 예시는 두개의 쓰레드를 이용하여, 하나의 객체에 대한 뺄셈 연산을 수행 하는 것 입니다. 또한, 잔고는 마이너스 값이 되면 안되므로, withdraw(int money)에서 money로 들어 간 값이 balance 보다 작으면 안됩니다. 실제 서버와의 통신을 가정 하여, Thread.sleep()을 걸어 보겠습니다. 두 개의 쓰레드를 이용 하여 해당 코드를 작성 해 보겠습니다.
class Account {
    private int balance = 1000;

    public int getBalance() {
        return balance;
    }

    public void withdraw(int money) {
        if (balance >= money) {
            try {
                Thread.sleep(1000);
            } catch (InterruptedException e) {}
            this.balance -= money;
        }
    }
}

class TestRunnable implements Runnable {
    Account account = new Account();

    @Override
    public void run() {
        while (account.getBalance() > 0) {
            int money = (int)(Math.random() * 3 + 1) * 100;
            account.withdraw(money);
            System.out.println("잔고: " + account.getBalance());
        }
    }
}

public class Main {
    public static void main(String[] args) {
        Runnable r = new TestRunnable();
        Thread th1 = new Thread(r);
        Thread th2 = new Thread(r);
        th1.start();
        th2.start();
    }
}
잔고: 900
잔고: 600
잔고: 400
잔고: 200
잔고: 100
잔고: -100프로그램이 종료 된 후, 잔고가 마이너스인 것을 미루어 보아, 의도대로 프로그램이 작동 하지 않았음을 알 수 있습니다. 우리는 결과에서 알 수 있듯이 두 개의 쓰레드가 동시에 코드를 실행하여 문제가 발생 했음을 알 수 있습니다. 두 개 이상의 쓰레드가 동시에 제어권을 잡지 않도록 하기 위해선 어떻게 해야 할까요?
우리는 synchronized 를 이용하여, 간단하게 한 쓰레드에서 해당 코드가 실행 될 때, 다른 쓰레드가 간섭하지 못하도록, 동기화가 되게 끔 구현 할 수 있습니다. synchronized 되었다는 것은, 이가 임계 영역으로 지정되었다는 것을 의미 합니다. 임계 영역으로 지정 되었다는 것은, 다른 한 쓰레드가 임계 영역이 끝날 때 까지, 건들 수 없음을 의미 합니다. 이러한 상태를 lock 상태라고 합니다.
// 중략
public synchronized void withdraw(int money) {
    if (balance >= money) {
        try {
            Thread.sleep(1000);
        } catch (InterruptedException e) {}
        this.balance -= money;
    }
}
// 후략
한 번 위 코드에 synchronized를 적용 해 보겠습니다.
class Account {
    private int balance = 1000;

    public int getBalance() {
        return balance;
    }

    public synchronized void withdraw(int money) {
        if (balance >= money) {
            try {
                Thread.sleep(1000);
            } catch (InterruptedException e) {}
            this.balance -= money;
        }
    }
}

class TestRunnable implements Runnable {
    Account account = new Account();

    @Override
    public void run() {
        while (account.getBalance() > 0) {
            int money = (int)(Math.random() * 3 + 1) * 100;
            account.withdraw(money);
            System.out.println("잔고: " + account.getBalance());
        }
    }
}

public class Main {
    public static void main(String[] args) {
        Runnable r = new TestRunnable();
        Thread th1 = new Thread(r);
        Thread th2 = new Thread(r);
        th1.start();
        th2.start();
    }
}
잔고: 800
잔고: 600
잔고: 500
잔고: 400
잔고: 100
잔고: 100
잔고: 100
잔고: 0
잔고: 0 // 반복 출력 되는 이유는 잔고가 0이 될 때 까지 while 문이 돌아가기 때문 입니다.동작이 잘 되는 것을 확인 할 수 있습니다.
wait(), notify()
만약 한 쓰레드가 객체에 lock을 걸고 어떤 조건이 만족될 때 까지 기다려야하는 경우, 다른 쓰레드들은 lock이 풀릴 때까지 무한 대기해야 하는 경우가 있습니다. 그런 경우를 방지 하기 위해선, 특정 조건이 만족 될 때 까지 기다려야 하는 쓰레드에서 wait() 을 호출 하고, 일시 정지 상태로 들어간 해당 쓰레드를 깨우기 위해서 notify()를 호출하는 경우로 해당 문제를 해결 합니다.
class Account {
    private int balance = 0;

    public int getBalance() {
        return balance;
    }

    public synchronized void withdraw(int money) {
        while (this.balance < money) {
            try {
                wait();
            } catch (InterruptedException e) {}
        }
        this.balance -= money;
        System.out.println(money + "원 출금 성공!");
    }

    public synchronized void deposit(int money) {
        System.out.println(money + "원 입금 중...");
        try {
            Thread.sleep(500);
        } catch (InterruptedException e) {}
        this.balance += money;
        System.out.println(money + "원 입금 성공! / 현재 잔고: " + this.balance);
        notify();
    }
}

class WithDrawRunnable implements Runnable {
    Account account;

    WithDrawRunnable(Account account) {
        this.account = account;
    }

    @Override
    public void run() {
        account.withdraw(1000);
    }
}

class DepositRunnable implements Runnable {
    Account account;

    DepositRunnable(Account account) {
        this.account = account;
    }

    @Override
    public void run() {
        account.deposit(100);
        account.deposit(200);
        account.deposit(300);
        account.deposit(400);
    }
}

public class Main {
    public static void main(String[] args) {
        Account account = new Account();
        Thread th1 = new Thread(new WithDrawRunnable(account));
        Thread th2 = new Thread(new DepositRunnable(account));

        th1.start();
        th2.start();
    }
}
100원 입금 중...
100원 입금 성공! / 현재 잔고: 100
200원 입금 중...
200원 입금 성공! / 현재 잔고: 300
300원 입금 중...
300원 입금 성공! / 현재 잔고: 600
400원 입금 중...
400원 입금 성공! / 현재 잔고: 1000
1000원 출금 성공!마치며
다음 시간에는 Java의 자료 구조들을 다루는 Collections 패키지에 대해서 알아 보는 시간을 가져 보겠습니다.