Java Collections
안녕하세요? JustKode 입니다. 우리는 프로그래밍을 하며, 동일한 규격을 가진 수 많은 데이터를 다루는 경우가 있습니다. 그럴 때 우리는 배열을 주로 사용 합니다. 하지만, 자료 구조를 배웠다면 알겠지만, 배열로는 수 많은 데이터를 다루기에는 부족하다는 것을 알 수 있습니다.
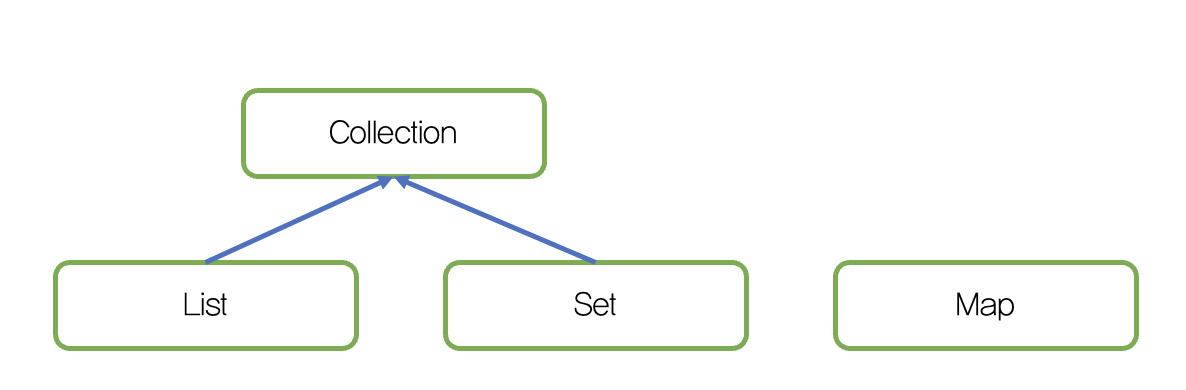
Java에서는 자료들을 쉽게 관리 하기 위해 제공하는 패키지, Collections 가 있습니다. 대표적으로 3가지 Interface로 나뉩니다.
- List: 순서가 있는 데이터의 집합 입니다. 데이터의 중복을 허용합니다. 구현 클래스로는
ArrayList,LinkedList,Stack,Vector가 있습니다. Python의list와 유사 합니다. - Set: 순서가 없으며, 중복을 허용 하지 않는 데이터의 집합 입니다. 구현 클래스로는
HashSet,TreeSet이 있습니다. Python의set과 유사 합니다. - Map: 키, 값 쌍이 있는 데이터 집합 입니다. Python의
dict와 유사 합니다.
위 3가지 Interface중 List, Set은 Collection 이라는 Interface를 상속 받습니다.
Collection Interface
Collection 인터페이스에서 구현을 요구하는 메서드들은 다음과 같습니다.
boolean add(Object o),boolean add(Collection c):Object o혹은,Collection c에 있는 모든Object를Collection에 저장 합니다. 성공 여부를 반환 합니다.void clear():Collection내의 객체들을 모두 삭제 합니다.boolean contain(Object o), boolean containAll(Collection c):Object o혹은,Collection c에 있는 모든Object가Collection에 있는 지 확인 합니다.boolean equals(Collection c):Collection c와Collection이 동일 한지 여부를 반환 합니다.int hashCode():Collection의hashCode를 반환 합니다.boolean isEmpty():Collection이 비어 있는지를 확인 합니다.Iterator iterator():Collection내의 객체들을 담고 있는Iterator객체를 반환 합니다.boolean remove(Object o): 해당 객체o와 일치 하는 객체를 제거 합니다.boolean removeAll(Collection c):Collection c에 있는 모든Object중 하나와 일치 하는 객체 모든 객체를 제거 합니다. 이 작업으로 무언가 지웠다면true를 반환 합니다.boolean retainAll(Collection c):Collection c에 있는 모든Object중 하나와 일치 하는 객체를 제외한 모든 객체를 제거 합니다. 이 작업으로 무언가 지웠다면true를 반환 합니다.int size():Collection에 저장된 객체의 갯수를 반환 합니다.Object[] toArray():Collection에 저장된 객체를Array로 변환 합니다.Object[] toArray(Object[] a):a에Collection내에 있는 객체를 저장 후 반환 합니다.
여기서 이야기 하는 Iterator 객체는, 객체를 순회할 수 있는 객체로, 다음 객체가 있는지 반환 하는 boolean hasNext(), 다음 객체를 반환 하는 Object next() 가 있습니다.
List Interface
List Interface를 이용한, 구현 클래스들의 상속 구조를 나타낸 그림입니다.
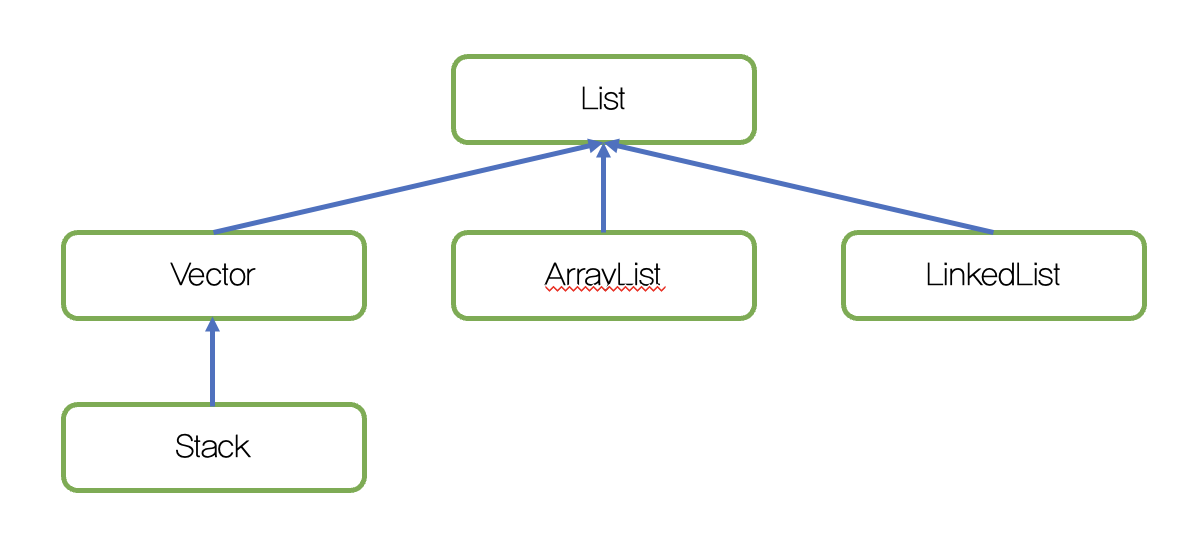
List Interface
- Vector: 삽입은 시간이 걸리지만, 탐색이 빠른 Vector 자료 구조 입니다.
- ArrayList: Vector 자료 구조를 개선 한 자료 구조로, Vector와 기능은 동일 합니다.
- LinkedList: 삽입은 빠르지만, 탐색이 느린 LinkedList 자료 구조 입니다.
List Interface에 구현 된 메서드들은 다음과 같습니다.
void add(int index, Object element):index위치에element를 객체를 추가 합니다.boolean addAll(int index, Collection c):index위치에c내에 있는 객체 모두를 추가 합니다. 성공시true를 반환 합니다.Object get(int index): 지정된 위치index에 있는 객체를 반환 합니다.int indexOf(Object o):o가 저장된 위치를 반환 합니다. (처음부터 훑음)int lastIndexOf(Object o):o가 저장된 위치를 반환 합니다. (마지막부터 훑음)ListIterator listIterator(),ListIterator listIterator(int index):List의 객체에 접근 할 수 있는ListIterator를 반환 합니다.index가 있는 경우,index위치 부터 반환 합니다.Object remove(int index):index위치에 있는 객체를 제거 후 반환 합니다.Object set(int index, Object element):index위치에 객체element를 삽입 합니다.void sort(Comparator c): 지정된 비교자로List를 정렬 합니다.List subList(int fromIndex, int toIndex):List의fromIndex부터toIndex까지 잘라서 반환 합니다.
대표적으로 사용 하는 LinkedList를 사용 하여, List 인터페이스 구현체들을 사용 해 보겠습니다.
일단 시작하기 전에, **C++**에서 배운 템플릿을 기억 하시나요? 우리가 이런 자료구조 구현체를 사용 할 때, STL을 사용 했던 것 처럼, Collections 패키지에 구현 된 클래스들은 템플릿 문법과 유사한, 제너릭 문법을을 사용 합니다.
예를 들어, Box<T>는 제너릭 클래스라고 불리고, 여기서 T는 타입 변수, Box는 원시 타입을 일컫습니다. 우리는 원시 타입을 갖는 특정 객체를 선언할 때, 사용하려는 의도에 맞게 타입 변수를 변경 해 주면 됩니다. 만약 우리가, Integer를 Object로 갖는 ArrayList 객체를 가지고 싶다고 가정하면, ArrayList<Integer> 이렇게 선언 하면 되는 것이죠. 한 번 해 볼까요?
일단 ArrayList는 선언 시에 얼마만큼의 객체를 담을 공간을 만들어 놓을 것인지, new ArrayList<T>(int size)로 생성 할 때 작성할 수 있습니다.
또한, sort(Comparator c)는, 저번에 이야기 한 익명 객체를 이용, 적절한 Comparator<T>를 삽입 하면 됩니다. 내부 compare(Object o1, Object o2)는 1, 0, -1을 반환 하도록 하면 됩니다.
import java.util.*;

public class Main {
    public static void main(String[] args) {
        // 초기화 및 아이템 삽입
        ArrayList<Integer> arrayList1 = new ArrayList<Integer>(10);
        arrayList1.add(1);
        arrayList1.add(2);
        arrayList1.add(3);

        ArrayList<Integer> arrayList2 = new ArrayList<Integer>(10);
        arrayList2.add(1);
        arrayList2.add(2);
        arrayList2.add(3);

        // Collection Interface에 구현 되어 있는 것
        System.out.println("1이 배열 내 존재 하는가?: " + arrayList1.contains(1));  // true
        System.out.println("두 ArrayList는 일치 하는가?: " + arrayList1.equals(arrayList2));  // true
        System.out.println("arrayList1의 hashCode(): " + arrayList1.hashCode());  // 30817
        System.out.println("arrayList1의 길이는?: " + arrayList1.size());  // 3

        System.out.println("뭘 하나라도 지웠는가?: " + arrayList2.removeAll(arrayList1));  // true
        System.out.println("arrayList2는 비었는가?: " + arrayList2.isEmpty());  // true
        System.out.println("arrayList1를 Array로 변환 하면?: " + Arrays.toString(arrayList1.toArray()));  // [1, 2, 3]

        Iterator<Integer> iter = arrayList1.iterator();
        System.out.print("[");
        while (iter.hasNext()) {
            System.out.print(iter.next() + ",");
        }
        System.out.print("]\n\n");  // [1, 2, 3,]

        // List Interface에 구현 되어 있는 것
        arrayList1.add(1, 3);
        System.out.println("arrayList1의 1번 인덱스에 3을 넣고 꺼내 보면?: " + arrayList1.get(1));  // 3
        arrayList2.addAll(arrayList1);
        System.out.println("arrayList2에 arrayList1을 다 넣어 보면?: " + Arrays.toString(arrayList2.toArray()));  // [1, 3, 2, 3]
        System.out.println("arrayList1에서 3이 있는 위치: " + arrayList1.indexOf(3));  // 1
        System.out.println("arrayList1에서 3이 있는 위치: " + arrayList1.lastIndexOf(3));  // 3
        System.out.println("인덱스 1에 있는 값을 지웠는가?: " + arrayList1.remove(1));  // 3
        System.out.println("그럼 현재 인덱스 1의 값을 4로 바꾸면?: " + arrayList1.set(1, 4));  // 2
        arrayList1.add(1, 2);
        arrayList1.sort(new Comparator<Integer>() {
            @Override
            public int compare(Integer o1, Integer o2) {
                if (o1 > o2)
                    return 1;
                else if (o1 == o2)
                    return 0;
                else
                    return -1;
            }
        });
        System.out.println("정렬 하면?: " + Arrays.toString(arrayList1.toArray()));  // [1, 2, 3, 4]
        System.out.println("1부터 2까지 추출: " + arrayList1.subList(1, 3));  // [2, 3]

        ListIterator<Integer> li = arrayList1.listIterator();
        System.out.print("[");
        while (li.hasNext()) {
            System.out.print(li.next() + ",");
        }
        System.out.print("] => 뒤로 한번더 [");

        while (li.hasPrevious()) {
            System.out.print(li.previous() + ",");
        }
        System.out.print("]\n");  // [1,2,3,4,] => 뒤로 한번더 [4,3,2,1,]
    }
}
1이 배열 내 존재 하는가?: true
두 ArrayList는 일치 하는가?: true
arrayList1의 hashCode(): 30817
arrayList1의 길이는?: 3
뭘 하나라도 지웠는가?: true
arrayList2는 비었는가?: true
arrayList1를 Array로 변환 하면?: [1, 2, 3]
[1,2,3,]
arrayList1의 1번 인덱스에 3을 넣고 꺼내 보면?: 3
arrayList2에 arrayList1을 다 넣어 보면?: [1, 3, 2, 3]
arrayList1에서 3이 있는 위치: 1
arrayList1에서 3이 있는 위치: 3
인덱스 1에 있는 값을 지웠는가?: 3
그럼 현재 인덱스 1의 값을 4로 바꾸면?: 2
정렬 하면?: [1, 2, 3, 4]
1부터 2까지 추출: [2, 3]
[1,2,3,4,] => 뒤로 한번더 [4,3,2,1,]Set Interface
Set Interface를 이용한, 구현 클래스들의 상속 구조를 나타낸 그림입니다.
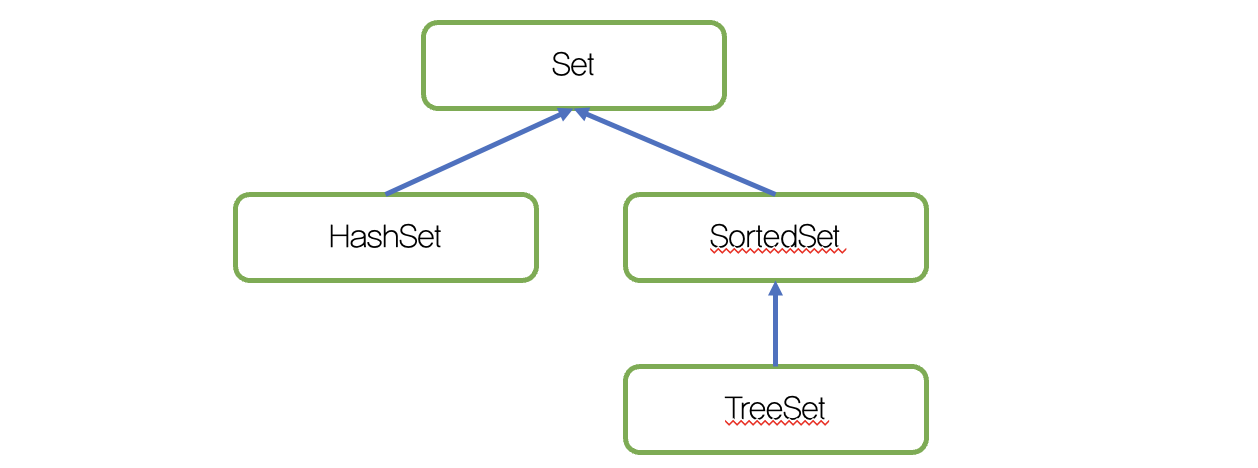
Set Interface
- HashSet: Hash Table을 이용, 데이터를 빠르게 접근 가능하도록 만든 자료 구조 입니다. 단, 저장 순서를 보장하지 않습니다.
- LinkedHashSet: Linked List + Hash + Set을 합친 자료 구조로, 저장 순서를 보장하는 HashSet입니다.
- TreeSet: 삽입은 느리지만, 탐색은 빠른 Tree 구조를 이용한 Set으로, 저장 순서를 유지 하지 않지만, 정렬 상태를 유지 가능한 자료 구조 입니다.
Set Interface에 구현된 인터페이스는 다음과 같습니다.
add(Object o):o가Set내에 없으면 추가 하고, 이미 존재하면false를 반환 합니다.contains(Object o),containsAll(Collection c):o혹은c내에 있는 모든element들이Set내에 존재하는지 반환 합니다.equals(Object o):o와Set이 같은 값을 가지고 있는지 확인 합니다.isEmpty(): 현재 집합이 비어있으면true, 아니면false를 반환 합니다.remove(Object o):o가Set내에 있으면 제거 하고, 제거 여부를 반환 합니다.size(): 집합 크기를 반환 합니다.clear(): 집합 내의 모든element를 제거 합니다.
Set 인터페이스 구현체의 대표격인 HashSet 을 이용한 예시는 다음과 같습니다.
import java.util.*;

public class Main {
    public static void main(String[] args) {
        // 초기화 및 아이템 삽입
        HashSet<Integer> hashSet = new HashSet<Integer>();
        hashSet.add(1);
        hashSet.add(2);
        hashSet.add(3);

        HashSet<Integer> hashSet2 = new HashSet<Integer>(hashSet);

        System.out.println("3 추가 성공 했는가?: " + hashSet.add(3));
        System.out.println("1이 Set 내에 있는가?: " + hashSet.contains(1));
        System.out.println("hashSet이 hashSet2를 포함 하는가?: " + hashSet.containsAll(hashSet2));
        System.out.println("hashSet2 내의 2를 지웠는가?: " + hashSet2.remove(2));
        System.out.println("hashSet과 hashSet2는 같은가?: " + hashSet.equals(hashSet2));
        System.out.println("hashSet의 크기는?: " + hashSet.size());
        hashSet.clear();
        System.out.println("hashSet은 비었는가?: " + hashSet.isEmpty());
    }
}
3 추가 성공 했는가?: false
1이 Set 내에 있는가?: true
hashSet이 hashSet2를 포함 하는가?: true
hashSet2 내의 2를 지웠는가?: true
hashSet과 hashSet2는 같은가?: false
hashSet의 크기는?: 3
hashSet은 비었는가?: trueMap Interface
Map Interface는 키-값을 저장 하는 자료구조를 구현 하기 위한 인터페이스 입니다.
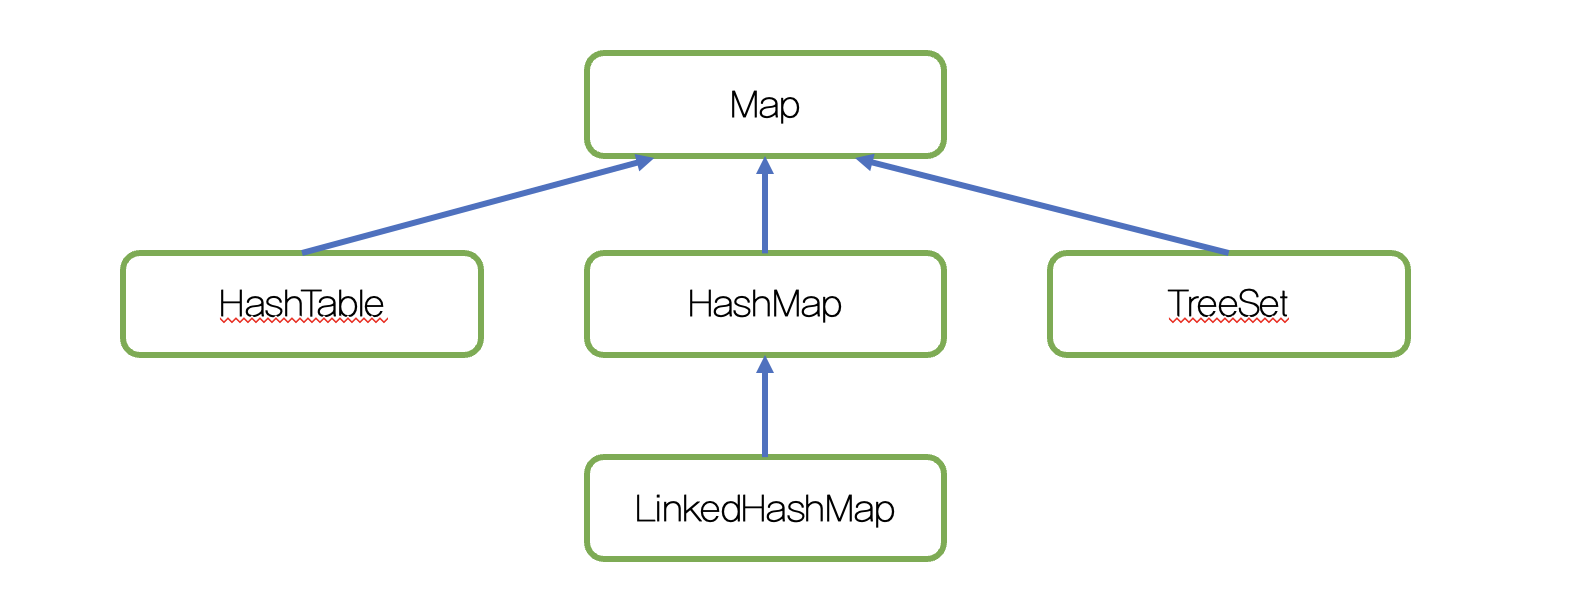
Map Interface
- HashMap: 키 값을 기반으로 한 정렬이 필요 없이, Hash 기법을 사용하여, 빠른 키 값 접근을 할 수 있는 자료 구조 입니다.
- HashTable: HashMap과 동일한 기능을 합니다. 현재
deprecated되었습니다. - LinkedHashMap: HashMap에 삽입 순서를 유지해 주는 기능이 추가된 것 입니다.
- TreeMap: 키 정렬 기능이 추가된 Map 자료구조 입니다.
Map Interface의 메서드는 다음과 같습니다.
Object put(Object key, Object value):Map내에key,value를 키-값 쌍으로 연결하여 저장 합니다.void putAll(Map t):Map에t에 있는 키-값 쌍들 모두를 저장 합니다.Object get(Object key):Map내에key와 일치하는 값을 추출 합니다.Object remove(Object key):Map내에key객체와 일치하는key-value객체를 삭제 합니다.boolean containsKey(Object Key):Map내에key와 일치하는 키-값 쌍 값이 있는지 여부를 반환 합니다.boolean containsValue(Object value):Map내에value와 일치하는 키-값 쌍 값이 있는지 여부를 반환 합니다.Set KeySet():Map에 저장된 모든key객체를Set을 이용 하여 반환 합니다.void clear():Map내의 모든 객체를 삭제 합니다.
Map 인터페이스 구현체의 대표격인 HashMap 을 이용한 예시는 다음과 같습니다.
import java.util.*;

public class Main {
    public static void main(String[] args) {
        // 초기화 및 아이템 삽입
        HashMap<Integer, Integer> hashMap = new HashMap<Integer, Integer>();
        hashMap.put(1, 1);
        hashMap.put(2, 2);
        hashMap.put(3, 3);

        HashMap<Integer, Integer> hashMap2 = new HashMap<Integer, Integer>();
        hashMap.put(4, 4);
        hashMap.put(5, 5);

        System.out.println("Key 3과 일치: " + hashMap.get(3));
        hashMap.putAll(hashMap2);
        System.out.println("Key 5 삭제: " + hashMap.remove(5));
        System.out.println("Key 4가 존재 하는지?: " + hashMap.containsKey(4));
        System.out.println("Value 5가 존재 하는지?: " + hashMap.containsValue(5));
        System.out.println("Key 값 모두 출력: " + Arrays.toString(hashMap.keySet().toArray()));
    }
}
Key 3과 일치: 3
Key 5 삭제: 5
Key 4가 존재 하는지?: true
Value 5가 존재 하는지?: false
Key 값 모두 출력: [1, 2, 3, 4]마치며
다음 시간에는 제너릭 구현, 열거형, 람다에 대해서 배워보는 시간을 가져보도록 하겠습니다.